Tuesday, August 24, 2010

Addicted to OOP


I love scouring ebay for out of production marines.

I try not to pay more than five or six dollars for them, but I think they add a little character to the army.


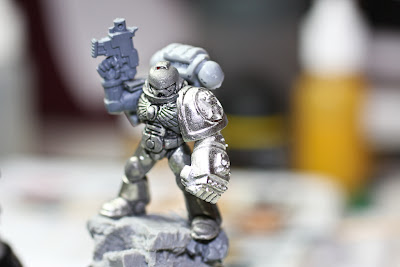
This Veteran Sergeant is finished off with shoulder pad and power fist from the bits packs GW released a few months ago.


Inspiration for this guy blatantly stolen from the great Ron at From the Warp.

Hoping to get some color on these guys this weekend.

Sunday, August 22, 2010

Painting Imperial Fists, Part 2: Mid-coat and Some Detail

A two-part feature has evolved into a three-part so I hope you will bear with me. Check out part 1 here.

As we continue, we have applied the mid-coat on top of a base of Iyanden Darksun with a Gryphonne Sepia.


The mid-coat consists of a 1-1 ratio of Iyanden Darksun and Golden Yellow. Be sure to leave a little of the base-coat showing in the armor recesses and places that need to be heavily shaded.

The chest eagle is lightly highlighted with P3 Khador Red Base and washed with Baal Red.


I like to premix the mid coat batch so I can get consistent results over multiple figures. Empty dropper bottles are great for mixing up custom mixes or washes.


Next, the helmet lenses were tackled by first blocking them out with Skull White and base of Dark Angels Green. Hit the front corners with a spot of Snot Green.


Finish off the lens with a small spot of Skull White in the back corners. As this zoomed shot can show you, my sloppy painting aside, a little cheat I used to clean up the area around the eye.

A Sakura Pigma Micron Pen, Brown size 005, was used to shade the spot under the lens to clean up any stray white or green paint. It was also used on the shoulder pauldron to give a quick shade on the rim between the black and yellow. The brown ink is quite close to the color of Gryphonne Sepia wash but a little more opaque. If I was a little neater it would look spectacular but from afar the result is adequate.


The backpack is completed in the same fashion as the armor and the bolter is dry fit in place. the bolter is based in Chainmail and hit with a Badab wash. Edge the bolter casing with Adeptus Battlegrey and another wash of Badab.

Next up, I will attempt to highlight the armor without totally ruining the model.

Tuesday, August 17, 2010

Painting Imperial Fists, Part 1: Base-coat and Wash

After a very long hiatus, I have returned to the 40K blog world. I hope not too many of you forgot about me.

Over the next two posts I am going to walk through how I do Imperial Fists. Hopefully it will give a few people some inspiration to tackle painting the dreaded yellow or to share how they do their fists.

im not the neatest painter nor the most talented but here goes:


Start with an even Iyanden Darksun from the Citadel Foundation range base-coat. It may look a little rough in places but that will be smoothed out in the next step.


Apply a liberal coat of Gryphonne Sepia from the Citadel Wash range and let dry. I like to tilt the model backwards to let the wash seep in to the crevices, dry, and then hit the back of the model and tilt dry again. Next, hit it with another liberal coat of wash.

A word on washes. I have gotten into the habit of adding a drop of Formula P3 mixing medium or Vallejo Model Color matt medium to the wash before applying. It keeps the pigment intact and improves the flow of the wash so it hits those seams in the armor without pooling on the flat parts too much. I used the P3 in this case.


Now, hit the chest eagle with P3 Khador Red Base. This gives a nice bright red without too much trouble.


Next, I apply two coats of Citadel Badab Black wash to the eagle. This tones the red way down and adds nice shadow to the wings and skull on the chest. I've also applied Citadel Chainmail to the armor joints, tubes and arm badge which was also then washed with Badab Black. I may have to apply another coat of wash as they are still a little to bright. I'm sure I could have goten a bit grimier with Boltgun Metal, but I tend to like the results of Chainmail with a wash.

The base was drybrushed first with Foundation Adeptus Battlegrey and then again with Astronomican Grey.

Well, thats all for the base of the miniature. Stay tuned for part two as we wrap it all up.